Friday, January 20, 2012

Quilt Retreat Catch-up

In October I was lucky enough to attend another retreat in Lake Tahoe, but thanks to Quilt Market and life in general, I never managed to get the photos posted. So here they are.
The gang at work with the Lake outside our windows
It was the same group from last year's retreat (although we missed De, Sue, Lynn, and Nancy very much). The locale was just as lovely, and the friends were dearer, because I knew them better.

Candy with her Featherweight
Mel & her Liberty print yoyos
Debbie and Kathy S. with their witch blocks
We decided last year to do a witch block exchange, and it was the first block exchange I'd participated in. I finished my blocks up just before I left, and we exchanged them on the last day of the retreat as a few members were still stitching.

Witch blocks by Molly and Mel
Figuring out how to put them together has been the perfect excuse to start collecting Halloween fabrics—a little of this for sashing, a bit of that for the border—as if I needed such an excuse.

The block ensemble
Haven't managed to start on that yet...the sewing, that is. The fabric collecting I'm pretty darned good at.

Carol finishing her blocks

Tina's Moooy (muy) Cowliente (caliente): Note the fringed udder
 One of the highlights of the retreat were the many cow quilts that kept being conceived and then quickly stitched. The idea for cow quilts comes from Mel and Mary Lou's new book Out of the Box with Easy Blocks book. These are a few of those that were created and then shown at Quilt Market the following week.

Psych-cow-delic by Mary Lou (detail)
Homage to Mary Lou (using all her fabrics) by Kathy C.
Boo-moo! Halloween quilt by Molly. Love the rick-rack spider legs


 A few other projects were undertaken, as well.

Debbie worked long and hard on her quilt back. Adding some cheddar fabrics was the final piece de resistance...it gave it the oomph it needed.

Tina got into some garment sewing (and cheerfully modeled).


 Mel and I stitched holiday table runners.

And making many baby bibs...flannel on one side, quilting cotton with rick rack details on the other, occupied a few of my sewing hours.

Can't wait for next year!


Tuesday, January 17, 2012

Mad Photo Skillz

My husband's 7th grade picture, on our workbench
Welcome to those of you who are visiting after reading my guest blogging post on the Quilt Gallery blog. Michelle was a real pleasure to work with and as a former teacher of writing, I really enjoyed the opportunity to share a few tips I've learned along the way. I'm planning to offer more suggestions about writing for blogs and for publication and possibly to be taking on a few online "students" in the future, so if you're interested check back, or even better drop me a line and let me know of your interest.

At any rate, along with writing I've greatly enjoyed the opportunities my work presents to improve my photography. I took photo classes in high school and spent many pleasant hours breathing in horrid chemicals under a red light—okay, so that wasn't a hightlight, but I so loved darkroom work—the magic of watching the image slowly appear in the trays of developer. I shot photos for my high school yearbook and continued through college to take and develop them. But as kids and life intervened, I switched to a point and shoot camera.

So it was with trepidation that I started shooting "serious" photos again, first for my blog, but then for Etsy stories and my Quilt County column. And now I love it. I still have much to learn, though, and one of my challenges is taking crisp, clean shots of individual items. Etsy has fantastic resources for taking great photos and there are lots of tutorials on line about photography, too. I used this one and this one when I decided to make a light box, and below are a few shots of the process.

Start with a box. This one was pretty large, and thus harder to store the finished product.


One one side, measure 2 inches in from each of the four edges of the box, marking the distance at intervals along each side.


Using a straight edge (a quilter's ruler would work well for this), connect the dots to draw a line. Then use a box cutter to slice the cardboard away, leaving a "frame." Do this to three of the boxes sides, leaving the back and bottom of the box uncut.


Below is what it will look like, with "frames" cut into three sides:


Next, cover the three "frames" with something white that is transparent enough to let in light. Some tutorials suggest tissue paper, but I thought this would be too easy to accidentally punch through. Most quilters have some muslin in their stash and so that's what I used, along with duct tape to hold it tightly in place.


When you've covered all three "frames" it will look like this on the outside and inside:


Now, add a sheet of white paper to the back and bottom. I got some poster board. Mine wasn't quite wide enough, but still works well for shooting small items. Then, add lights. I placed mine directly under the lamp that lights our kitchen table. It's near a window and I hoped the natural light might be enough, but in retrospect I would add lights to either side. Again, if you're a quilter and have an Ott light or other portable light, these would be ideal to place on the sides.


And finally, try some sample photos. While I love the white background, I think they would be made much crisper by adding side lighting (portable shop lights would work well, too).


There you have it! I'm more than a little embarrassed that I didn't take the time to crop and enhance these photos. And I think that the scarf in the bottom photo would show off much more effectively on a live model (like this one). But you get the idea. Take the time to get creative with it—try lights on just one side, change the color of your background, etc. It will go a long way toward improving your photos!


Do you have any great tricks for shooting textile photos for your blog? What do you think of this light box? I'd love to hear from you!

Thursday, January 12, 2012

A Featherweight Comes Home

My very sweet husband wanted to get me a ring for Christmas. He found one on Etsy that I'd marked as a favorite, but another buyer had snatched it up. So he asked me to choose a replacement.

While his impulse was a lovely one, there was something else I'd been wanting for quite some time—a Singer Featherweight sewing machine. These 11-pound wonders were built and sold in the 1940s and 1950s, and lots of quilters love them and use them regularly.

My friend Kristin pieces on one that belonged to her mother and another friend Candy brought hers to our Lake Tahoe retreat and whipped up a couple of quilts with it. They pretty much go forward and backward and that's it, but they're easy to transport, have a terrific 1/4-inch stitch, and are as cute as a button.

We were lucky to find a reasonably priced Featherweight on Craigslist. The machine had belonged to the grandmother of the young man who was selling it—she'd used it to stitch charity projects for her church. Neither the seller nor his fiancĂ© sew.

I'm trying to decide what it is that makes me so happy with this little wonder. It's adorable, of course, and there is something so fantastic about the fact that it not only works, but works incredibly well.

I think it's the story that goes with it—the young man and his fiancĂ© are both students and could undoubtedly use the money, so they were pleased to make the sale. And I loved the absurdity of meeting at a shopping mall, where they pulled the machine from its little black case, plugged it in at a wall outlet, and oblivious to the shoppers strolling past, I tested its sewing ability with the bit of fabric I'd tucked in my purse for just that purpose.

As we left, the young man shook our hands and told me that he knew his grandmother would be pleased that it wasn't sitting unused in his house, but instead bringing pleasure to another stitcher. The Featherweight was part of his family's history and its purchase has added to our family lore. I can't wait to use it to stitch my next quilt.

Tuesday, January 3, 2012

Inspiration for the New Year

I don't mean to come off like Oprah, promising to change your world. But I do find that tips or quotes can sometimes provide a succinct way to put things into perspective. Here are two that inspire me:

Inspiration number one: This quote attributed to educator, theologian, and civil rights activist Howard Thurman. He founded the first intercultural, racially integrated church in the United States, the Church for the Fellowship of All Peoples in San Francisco.

I came across this quote a few years ago in a profile I read in my husband's alumni magazine. It resonated so strongly for me because it was a time when I was going through a lot, trying to figure out what my next step should be.

This Christmas Eve my daughter Rebecca got off the plane with a big piece of cardboard and it turned out to be this poster. She remembered how much I loved this quote and purchased the poster from letterpress printer bookish lady. I'm planning to hang it in my study, so that I am reminded on a daily basis to honor the choices I've made and to prioritize my life so that the things that make me come alive don't get buried in the mundane activities that can eat up a day. It also helps me remember that doing so can have repercussions beyond what makes me happy...that my choice can serve others.

Inspiration number two: Today's Etsy blog post by Noah Scalin, who's written Unstuck: 52 Ways to Get (and Keep) Your Creativity Flowing at Work, Home, and In Your Studio. 
I haven't read the book, but I quite like his six suggestions in the Etsy post. Check them out here.

How about you? Any tips or quotes that are inspiring you this new year? I'd love to hear them!

Saturday, December 31, 2011

Setting my own standards: A New Year's goal

I wrote this months ago and it seems fitting to post today, New Year's Eve. One of my resolutions for the coming year is to pay attention to what is truly important to me—to not let others opinions or expectations weigh so heavily on my decision-making process. Read on...

On a sunny, brilliant September morning, I was rowing with my coach. As we watched the women's University team pass, she muttered something about what she figured they were thinking about her—that if she was really good, she'd become an elite rower, for example, rather than coaching a community club team.

I countered that applying other people's standards was silly and that what she was doing was so important. Because of her, people are learning a new skill and enjoying an opportunity that otherwise wouldn't exist.

And then I realized that I apply the same sorts of standards to myself. I feel inadequate because I don't make big bucks with my work. And I question whether others see me as a "real" writer.

Writing is taken seriously where I live. Iowa City is one of four Cities of Literature in the world and home to the top creative writing program in the country. We're lousy with writers—we brush elbows with Pulitzer Prize winners at the farmer's market and stand in the check-out line at the public library with authors of critically acclaimed novels. I often feel sheepish identifying myself a writer in such refined company. And yet writing is what I do day in and day out and I work hard at it.

So I told my coach that we both need to stop judging ourselves by impossible and entirely inappropriate standards. Easy to say, hard to do.

How about you...are there expectations or standards you judge yourself by that don't really fit with your goals? No? Then how do you avoid such behavior?

(For the record: my coach is figuring it out. She was recently hired full time to be our club coach and says it's her dream job.)

Thursday, December 22, 2011

Happy Holidays!

Things have been a little quiet around here—family matters have intervened. My mom was in the hospital for 11 days and I flew out to be with my folks when she was released. Fortunately, she is doing better, but we had quite a few days where once we got her clean, fed, and comfortable, she'd nap. I'd been planning to finish for her Christmas gift a table runner I'd pieced earlier in the year, and her naps gave me the perfect chance to do so.

I used her very snazzy Brother Ellismo machine to quilt it. We had some trouble getting the free motion functions to work (my mom uses the machine primarily for embroidery), so I ended up using the walking foot to do some straight stitching. I was a little intimidated by all its bells and whistles at first, but the wonderful extra work space, ease of threading, and amazing needle threader really won me over. It didn't take too long to figure it all out (except for the free motion aspect), which surprised me, too. I love the two machines I most often use—a Bernina 153QE and a Janome 6600. But I gotta say, this one was pretty pleasing.

So here are some shots of the final result. The pattern is so much fun—Lone Pine, made with X-blocks. My buddy Mel and I bought these rulers two summers ago when we met at a quilt shop in Manchester, Iowa, during the riding of RAGBRAI. Neither of us had ever used them and wasn't sure I would. But they were very fun—kind of like using my mom's sewing machine—they offered a new take on something you do regularly, in this case strip piecing. Yes, the binding is a bit wobbly, and I think a bit of free motion between the trees would have been great, but given the situation, I'm happy with it, as was my mom.

Hope you all have a wonderful holiday, filled with time to read, sew, be with friends and family, and relax. Cheers!

Saturday, December 17, 2011

WPA—Would Politicians Approve?

John V. Bloom mural in Tipton, IA post office
I'm so lucky! There are, of course, many, many things that make me feel lucky in life. But right now I'm referring to the fact that I get to travel around the Midwest learning about and photographing things I never before knew existed (or may have taken for granted).

Moline, Illinois post office (currently for sale for $400,000)
That's the way I felt with today's Etsy post on the Works Progress Administration (WPA) era. I knew a little about it (and frankly I still know just a little about it, because it turns out there is so much to know). During Franklin Roosevelt's time more than 100 departments, known as the "Alphabet Agencies," were formed by the government to both provide work for people on relief (unemployed and supported by welfare).

These jobs included all kinds of artistic and recreational endeavors, as well as construction projects (many under the auspices of the Civilian Conservation Corps—CCC). While I chose to focus on murals and buildings within driving distance of my home (and in the case of the boathouse above, within walking distance), I discovered that there are a plethora of WPA-era murals in post offices around Iowa and Illinois.

Edward Millman mural in Moline, IL post office
There are, of course, well known murals from this time period—those in San Francisco's Coit Tower come to mind. But to learn that so many murals were painted for tiny post offices, and that most are still in existence, amazes me...to know that every day people are in the presence of artwork whose creation helped feed artist's families, while enabling artists (and actors, musicians, writers, and craftspeople of all sorts) to continue in their chosen line of work...and to know that the government valued those lines of work enough to support them, is nothing short of stunning.


There were certainly people who felt disdain for the New Deal and the Alphabet Agencies, but not so many that the programs didn't exist.


I've had a number of conversations with people about whether this kind of government work program could work today. What do you think? Why or why not?

Tuesday, December 6, 2011

And I Will Make Thee a Bed of Roses...

People who know me hear me complain about not having enough time to sew. "I write about sewing all day, but I hardly ever get to do it!" goes the whine. It's often true. But last Friday I got together with some friends at Inspirations, a newish quilt shop in Hills, Iowa, to sew. The shop has a sunny classroom space where we gathered, and I managed to make 45 pennants for three more holiday garlands, which I finished up today.

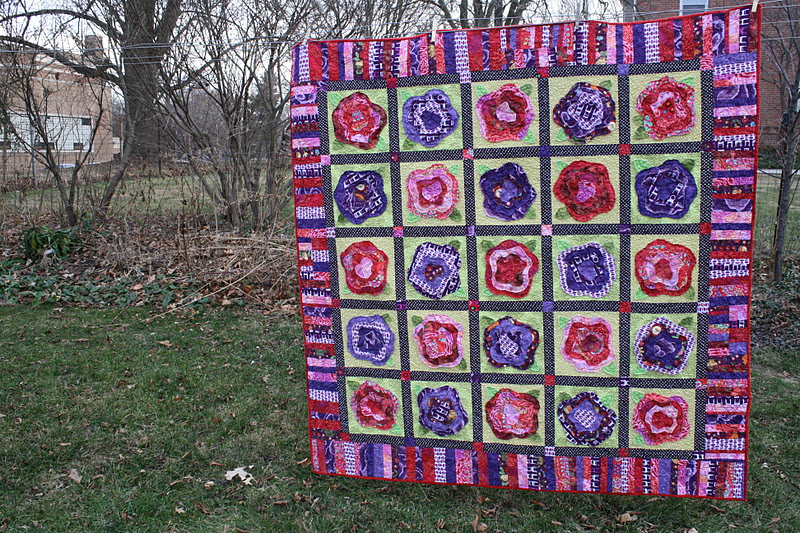
Garlands are one thing, but it takes me an awfully long time to complete a quilt. I've slowly come around to the idea that a quilt doesn't need to be quick and that it's fine to have more than one project going at a time. So I'll try not to feel too terrible about showing you something that took me more than a year to complete. It was worth the wait.

The quilt started out in October 2010, when I took a French Roses class at Common Threads. (The pattern is an old one by Heather French—sorry, I can't find a link to her site.) I was excited about the colors and fabrics, and took the quilt to Lake Tahoe to work on. It was there I realized what a creative bunch I was sewing with. The pattern is traditionally put together without sashing, but someone suggested I add some and someone else brought over some black and white options to audition. Keystones punch it up a bit more (I fussy cut a few of them ato highlight the mushrooms, birds, and chairs). And finally, over the summer, I added the "strata" border (a Mary Lou Weidman term). It is such a great reminder that it's okay to change up a pattern and to do some things that take a bit of extra time, rather than rush to finish.

Linda Duncan quilted it and I just love what she did. She used a pink thread that really gives the quilt spark, and she tried a new technique on the flowers. Rather than quilting around each layer, as she's done on French Roses quilts in the past, she stitched "spokes" in hopes that when the quilt was washed it would create "petals." Indeed, it worked just that way.

I am once again a bit giddy, and I can't help but pat myself on the back for taking a pattern of long-standing and giving it a different twist. I can't bring myself to put the quilt away (and it goes with absolutely nothing in my house). So I've got it hanging over the stair rail, where I can admire it daily and force unsuspecting visitors to tell me how much they like it, too.

Thursday, December 1, 2011

Pennants? Banners? Garland? Let's just call it holiday decor

My eldest daughter was with us over Thanksgiving and we had a massive list of things we hoped to accomplish (perhaps "accomplished" is too strenuous a word, as our activities included sleeping in, playing Bananagrams, viewing the new Muppet movie, and eating a seemingly endless supply of pumpkin pie).

Our two crafting plans were to make folded German paper stars and stitch holiday banners/garlands. I've made those paper stars a million times, and once even held a "how-to" session at my office to teach my coworkers. But try as we might, Maggie and I really struggled and in the end we were doing something wrong. Maggie's excellent at origami—she used to make bouquets of folded flowers for her friends' birthdays—but this task eluded even her.

I wasn't very helpful because I was largely focused on sewing. Maggie's moved into an apartment and will be visiting us for Christmas, so she's decided not to get a tree. I told her she still needs some snippet of festive decor and thought a holiday garland would be easy to put up and simple to store.


There are umpteen tutorials online for these and I spent a ridiculous amount of time perusing the methods for making them—fused, raw-edged, with interfacing and without, etc. I refused to consider any with templates and finally settled on an amalgam of techniques. I used the cutting instructions from What I Made Today because you could create multiple pennants from a 9" strip of fabric. But I thought they looked a little more finished if I sewed them right sides together, then turned and top-stitched each pennant. I used pre-made double fold seam binding for the "string" and stitched them fairly close together. I was kind of giddy about the results (it takes so little, really, to put me in that state). I thought it might also be cute to clip holiday cards in between the pennants with sweet little clothespins.

Okay Maggie, I'm waiting for that photo of your garland on the bookshelf! (And sorry these photos are a bit dodgy...I was rushing to sew and shoot, so she could pack.)